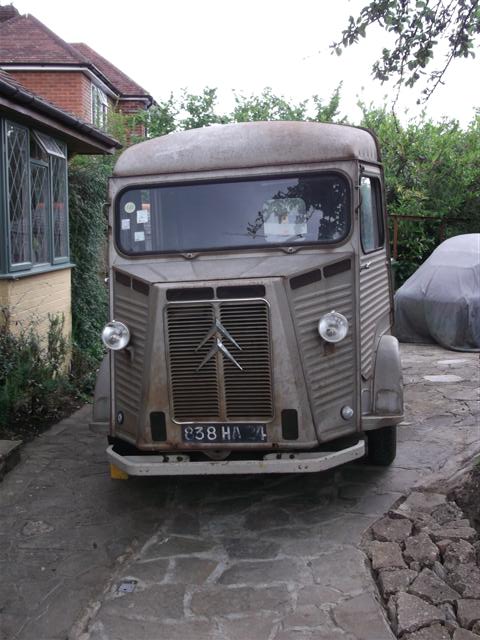
Citroen HZ van 1965 restoration
This van is a one owner clothes salesmans’ van from the Dordogne with about 65000km on the clock.
First job was to remove all the doors, access panels, fuel tank, lights, screen etc and then strip down the doors etc, removing all lock mechanisms etc.
Then I removed all dents, it was surprising how easily most of them sprung out. I used ¾” timber quadrant to fit into the flutes then hammered along the spine of the timber to knock out the dents.
There was virtually no perforating rust anywhere on this van, except for a couple of spots, one of which was on the underside of the waist-level external box section at the front on the left side (this hole will be a drain hole), under the outflow from the roof gutter and one tiny pinhole just inboard of the banana panel on the left side (which I will fill).
Then I did a little welding on the spare wheel cover (the underside of the box section was heavily perforated), and welded one mirror-mounting bracket to its cab door (the large steel mirrors are too heavy for their single fixing, so I’ll source some smaller lighter ally ones.
I then derusted and painted the lower areas of all the window reveals (just front screen and cab doors) with a 2 part epoxy paint (Rustbuster 121), several coats to ensure these vulnerable areas don’t rust.
Then the bare metal respray. The van was speckled over much of its surface with surface rust. I treated the van in 5 sections (roof, rear, each side,front) in turn. First I removed all of the old seam sealer and there is quite a lot of it: this is important as it will be hiding rust under it: especially important is to remove all the sealer along the top of the horizontal box sections: I then applied a rust converter (Rustbuster fe123) into these upper seams. I stripped all the paint off each section using Clean n Strip discs (the layer of original paint was quite thin), degreased carefully, then a phosphoric acid etch then several coats of 2 pack epoxy primer (Rustbuster 421).
As it was all done in sections and outside, the epoxy was essential , as it won’t absorb humidity. Also, the primer is quite hard to sand, so it doesn’t easily sand through on the fluted sections.
After all sections were primed, I did the same with the loose panels and doors.
Then I re-fitted the mudguards, but I did not use the plastic fill strips, I used stainless spacer washers instead, then I filled the gap with Tiger Seal, using a very small nozzle to get the sealant deep into the gap. Then I seam sealed in all the necessary places: it is important to think carefully where water will enter and seal as necessary: there is a lot of sealing to do.
Then I applied a very small amount of filler to those dents which were impossible to remove: this van has hardly any filler anywhere on it, and I prefer to leave slight undulations as they are rather than applying a lot of filler. I then sprayed a further coat of epoxy primer over the filled areas.
Then each section, including its relevant loose panel, were top coated in 2-pack Nissan Golden Sand plus a semi-gloss lacquer, as I didn’t want a glossy finish.
Then I cleaned each wheelarch area, again, no serious rust, just surface: the arches had been treated with underseal, most of which was still absolutely sound, so I all I did was wire brush the whole area and remove loose underseal: I treated the surface rust with Dinitrol 3125, then coated the whole area with Dinitrol 4941, it needs several coats to get an even finish. I did not like the wiring running along the ledge in the rear arch and under the cover plate in the front arch, and through the box section of the banana panel, so I cut it all out, and removed all the loom retaining tangs in the rear arch, so there’s much less likelihood of mud getting trapped. I will run the wiring internally. It is also very important to treat the inner areas of the banana and triangle panels very carefully, as these rot out commonly.
After painting, I set about injecting all the box sections with a rust-arresting fluid (Dinitrol ML or Dynax S50). I drilled injection holes at about 1m intervals in all the box sections, both internal and external, including the doors and access panels, All in all, I drilled more than 50 holes: this is essential if these vans are to survive in our climate. After injecting the fluid, you will spend hours mopping up excess fluid seeping out.
I then set about refitting all the doors and panels: I used all stainless fixings, including the M7 fixings retaining the jacking guide brackets, petrol tank cover etc. The front screen was put back in by a professional, using the good original rubber (the van had spent most of its life in a dry dark barn).
H van restoration: fitting up doors etc
I made rubber gaskets (from 1mm hard rubber sheet) for all the exterior handles and for the jacking guide lugs that bolt to the outside of the van. This avoids any metal to metal contact of bolted parts.
Most important of all, I injected rust-arresting fluid into the cavities of all the doors and panels: this needs to be done before fitting the doors on, so the doors can be turned so that the fluid soaks into every seam.
The cab door windows presented the most difficult reassembly problems. I relieved the holes through which the locking pins pass and then fitted the window lock plunger block to the underside of the lower reveal using stainless screws. I liberally greased the locking pins and then held the lock pins with mole grips against the spring compression. I then greased and fitted the thumb-half-turn assembly, released the pins and checked that they moved up and down freely.
The biggest problem is that the new window frames are made from thick aluminium rather than the thin steel of the originals resulting in the frame being set further inboard: this means that the locking pins are not ideally positioned.
Anyway, the ally frame needs drilling to “take” the 2 lock pins and the 6 frame fixings (there are 4 self-tappers in the corners and 2 spiral pins just beyond the lock-pin assembly.) When you drill through the frame, the drill will pick up the fabric material and make a real mess, so pull the material away with a pick in that area. I drilled all new fixing holes as its very difficult to line up the frame so that the original fixing holes can be used.
Then assemble the glass into the frame and the frame into the rubber seal. Push the assembly into the opening from the inside of the door and tease the rubber seal over the steel door lip. You will probably find that the locking pins will not pass through the frame due to the problem mentioned above. So, frame out, file ally frame so pins will pass through. Reassemble, and when lock pins pass through ok, fix frame in position with small stainless self-tap screws.
Alternatively, before fitting the locking pins through its block, drill the holes in the block oversize and bend the pins slightly so they curve inboard at the top.
H van leaks
Having been inside my bare van when it was pouring, I got to know where the leaks are.
The rear number plate lamp leaks through the grommet mainly: there needs to be a nice compliant rubber seal to seal lamp unit to body (don’t use the old hard plasticcy gasket) and the lens should be similarly sealed to the body. Even so, the single fixing screw/nut doesn’t afford a particularly tight “pull” of lamp to body.
Don’t forget to fit blind rubber grommets to the cargo door wheel access holes at the top.
The cab doors leak at the top where the hinge is: originally, there were small rubber pads glued to both top and bottom of B-post, but these aren’t very effective at keeping out heavy rain, which then runs down the inside of the B-post onto the floor. What I may do is to make up a small shaped plate which hooks over the gutter upstand and protrudes outwards to shield the open hinge area from rain.
The other main area of leaks is the cab windows themselves: the way the design is, any water which gets into the window channel will find its way down through the holes for the window lock pins and run out through the quarter-turn lock plate onto the cab floor and down into the crevices around the banana panel and will also fill the cab door up with water. I don’t see any way around this except to have new windows made up (normally fitted to yachts) which have a flange which fits to the outside face of the cab door window flange. The window would effectively be smaller than the original windows, but any water getting into the channel would be drained direct to outside of the door.
The only other source of leaks will be the cab floor, but I’ve not checked that out yet.